Ouverture de la maison (Servomoteur)⚓
Si la "bonne" personne est détecté, on commande l'ouverture de sa maison.
On va se servir d'un servomoteur pour notre maquette, représentant le déverrouillage de la maison si la personne est reconnue devant sa maison.
Schéma de connexion
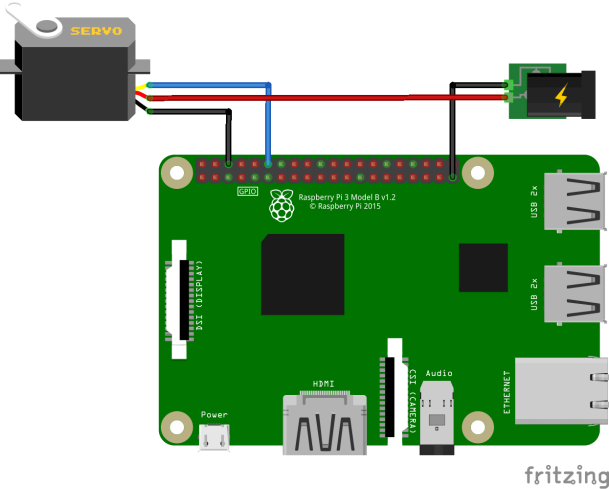
Le Servo moteur possède 3 fils :
Le fil rouge : +5V;
Le fil noir : GND, 0V;
Le fil blanc/jaune : fil de data, où les ordres circulent du Raspberry vers le Servo.
Pour alimenter le Servo, il est préférable d'utiliser une alimentation externe de 5V, surtout si l'alimentation de votre Raspberry délivre peu de courant.
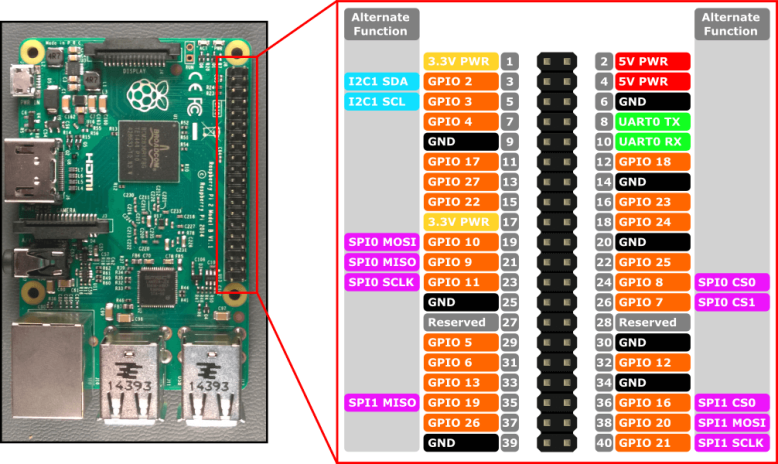
Voici la description des broches du Raspberry Pi 3.
Exemple de code.
Tester ce code :
1
import RPi.GPIO as GPIO
2
import time
3
4
GPIO.setmode(GPIO.BCM)
5
GPIO.setup(17, GPIO.OUT)
6
GPIO.setwarnings(False)
7
8
ajoutAngle = 5
9
10
print("\n+----------/ ServoMoteur Controlleur /----------+")
11
print("| |")
12
print("| Le Servo doit etre branche au pin 11 / GPIO 17 |")
13
print("| |")
14
print("+------------------------------------------------+\n")
15
16
print("Comment controler le Servo ?")
17
choix = int(input("1. Choisir un angle\n2. Faire tourner de 0 a 180\n"))
18
19
20
if (choix == 2) :
21
nbrTour = int(input("Entrez le nombre d'aller-retour que fera le Servo :\n"))
22
23
pwm=GPIO.PWM(17,100)
24
pwm.start(5)
25
26
angle1 = 0
27
duty1 = float(angle1)/10 + ajoutAngle
28
29
angle2=180
30
duty2= float(angle2)/10 + ajoutAngle
31
32
i = 0
33
34
while i <= nbrTour:
35
pwm.ChangeDutyCycle(duty1)
36
time.sleep(0.8)
37
pwm.ChangeDutyCycle(duty2)
38
time.sleep(0.8)
39
i = i+1
40
GPIO.cleanup()
41
42
if (choix == 1) :
43
angle = float(input("Entrez l'angle souhaite :\n"))
44
duree = int(input("Entrez la duree durant laquelle le Servo devra tenir sa position : ( en secondes )\n"))
45
46
pwm=GPIO.PWM(17,100)
47
pwm.start(5)
48
49
angleChoisi = angle/10 + ajoutAngle
50
pwm.ChangeDutyCycle(angleChoisi)
51
time.sleep(duree)
52
GPIO.cleanup()
Question⚓
Réaliser le montage c-dessus.
Question⚓
Combiner les 2 codes (reconnaissance faciale et servomoteur pour remplir l'objectif fixée.
Code de base de la reconnaissance faciale
1
# USAGE2
# python pi_face_recognition.py --cascade haarcascade_frontalface_default.xml --encodings encodings.pickle3
4
# import the necessary packages5
from imutils.video import VideoStream
6
from imutils.video import FPS
7
import face_recognition
8
import argparse
9
import imutils
10
import pickle
11
import time
12
import cv2
13
14
# construct the argument parser and parse the arguments15
ap = argparse.ArgumentParser()
16
ap.add_argument("-c", "--cascade", required=True,
17
help = "path to where the face cascade resides")
18
ap.add_argument("-e", "--encodings", required=True,
19
help="path to serialized db of facial encodings")
20
args = vars(ap.parse_args())
21
22
# load the known faces and embeddings along with OpenCV's Haar23
# cascade for face detection24
print("[INFO] loading encodings + face detector...")
25
data = pickle.loads(open(args["encodings"], "rb").read())
26
detector = cv2.CascadeClassifier(args["cascade"])
27
28
# initialize the video stream and allow the camera sensor to warm up29
print("[INFO] starting video stream...")
30
vs = VideoStream(src=0).start()
31
# vs = VideoStream(usePiCamera=True).start()32
time.sleep(2.0)
33
34
# start the FPS counter35
fps = FPS().start()
36
37
# loop over frames from the video file stream38
while True:
39
# grab the frame from the threaded video stream and resize it40
# to 500px (to speedup processing)41
frame = vs.read()
42
frame = imutils.resize(frame, width=500)
43
44
# convert the input frame from (1) BGR to grayscale (for face45
# detection) and (2) from BGR to RGB (for face recognition)46
gray = cv2.cvtColor(frame, cv2.COLOR_BGR2GRAY)
47
rgb = cv2.cvtColor(frame, cv2.COLOR_BGR2RGB)
48
49
# detect faces in the grayscale frame50
rects = detector.detectMultiScale(gray, scaleFactor=1.1,
51
minNeighbors=5, minSize=(30, 30),
52
flags=cv2.CASCADE_SCALE_IMAGE)
53
54
# OpenCV returns bounding box coordinates in (x, y, w, h) order55
# but we need them in (top, right, bottom, left) order, so we56
# need to do a bit of reordering57
boxes = [(y, x + w, y + h, x) for (x, y, w, h) in rects]
58
59
# compute the facial embeddings for each face bounding box60
encodings = face_recognition.face_encodings(rgb, boxes)
61
names = []
62
63
# loop over the facial embeddings64
for encoding in encodings:
65
# attempt to match each face in the input image to our known66
# encodings67
matches = face_recognition.compare_faces(data["encodings"],
68
encoding)69
name = "Unknown"
70
71
# check to see if we have found a match72
if True in matches:
73
# find the indexes of all matched faces then initialize a74
# dictionary to count the total number of times each face75
# was matched76
matchedIdxs = [i for (i, b) in enumerate(matches) if b]
77
counts = {}
78
79
# loop over the matched indexes and maintain a count for80
# each recognized face face81
for i in matchedIdxs:
82
name = data["names"][i]
83
counts[name] = counts.get(name, 0) + 1
84
85
# determine the recognized face with the largest number86
# of votes (note: in the event of an unlikely tie Python87
# will select first entry in the dictionary)88
name = max(counts, key=counts.get)
89
90
# update the list of names91
names.append(name)
92
93
# loop over the recognized faces94
for ((top, right, bottom, left), name) in zip(boxes, names):
95
# draw the predicted face name on the image96
cv2.rectangle(frame, (left, top), (right, bottom),
97
(0, 255, 0), 2)
98
y = top - 15 if top - 15 > 15 else top + 15
99
cv2.putText(frame, name, (left, y), cv2.FONT_HERSHEY_SIMPLEX,
100
0.75, (0, 255, 0), 2)
101
102
# display the image to our screen103
cv2.imshow("Frame", frame)
104
key = cv2.waitKey(1) & 0xFF
105
106
# if the `q` key was pressed, break from the loop107
if key == ord("q"):
108
break109
110
# update the FPS counter111
fps.update()
112
113
# stop the timer and display FPS information114
fps.stop()
115
print("[INFO] elasped time: {:.2f}".format(fps.elapsed()))
116
print("[INFO] approx. FPS: {:.2f}".format(fps.fps()))
117
118
# do a bit of cleanup119
cv2.destroyAllWindows()
120
vs.stop()